Using Echo360 Active Learning Platform
Macquarie University's learning platform caters to all learning needs and allows both teachers and students to make the most of the learning experience. Learn how to use all its features.
The Echo360 Active Learning Platform is the University's lecture recording system. Among other resources, it includes:
- interactive features your lecturer may use such as polls and quizzes
- a place to write your private study notes
- the option to bookmark parts of a presentation
- a Q&A discussion section within each presentation
In most cases, the audio and presentation screen is recorded (microphones may pick up audio from across the lecture room) and a camera view of the presentation area is available in some rooms.
Access Echo360 Recordings
Check your iLearn unit for the Echo360 Active Learning Platform block to access lecture recordings and participate in interactive presentations and live streams.
Lecture recordings will appear as they are created on the class list and are typically available within two hours of the actual lecture completion. Some units may have a list of recordings already at the start of the session, while others may provide supplementary recordings throughout it.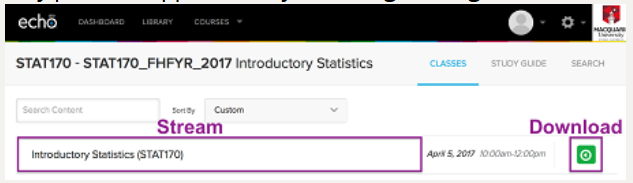
- If a listed class is displaying the 'Video' icon, click the recording title to open as a stream. If you prefer to download the recording, click the Video icon on the right of the class list and choose download original.
- A listed class may only contain static presentation slides rather than a recording and you can access them with the 'Presentation' icon. Some classes contain both a recording and a presentation.

- A recording may consist of only audio, but most will include the presentation display. Some recordings may also contain a separate slide window which you can flip through at your own pace and may also contain quiz and poll slides which were either used during the lecture or may be open for you to answer while watching the video (see the Interactive Presentation feature below).
- Use the volume control to adjust or mute the audio level.
- Use the playback controls to play/pause and skip through a recording.
- Use the playback settings to change quality (lower the quality setting if you are experiencing dropouts in playback). You can also adjust the playback speed faster or slower.
- Select the Notes icon to take personal study notes. You can access them anytime in the future.
- Select the 'Q&A' icon to view or respond to discussions. Select the New Question icon to submit a question to the discussion. Q&A submissions are visible to other students and any instructors active in the Q&A section. You can post questions anonymously to fellow students, your lecturer will be able to see your name. The Q&A feature may not be enabled for some units.
If you have chosen to live stream any of your lectures, click on the Echo360 block in your iLearn unit at the scheduled time of the lecture. All lectures, including those that are live-streamed, will also be recorded and made available after the lecture through the Echo360 block in iLearn.
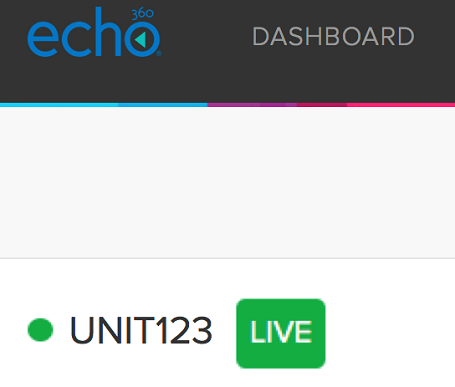
- Commenced live streams are listed with a green icon. Click the current live stream from the list to open.
- If the live stream is due to start shortly, you will see a countdown timer. When the live stream has started, click 'show live stream'.
- The live stream consists of the presenter’s microphone audio and the displayed presentation. The live stream may include video camera footage. Some live streams may also contain a slide deck which you can flip through at your own pace and may also contain quiz and poll slides which you will be prompted to answer during the live stream.
- Use the volume control to adjust or mute the audio level.
- Select the Notes icon to take personal study notes. You can access notes for review anytime again in the future.
- Select the Discussion icon to view or respond to discussions.
- Select the New Question icon to submit a question to the discussion. This option may not be enabled in some units.
- Q&A submissions are visible to other students and any instructors active in the Q&A section. You can post questions anonymously to fellow students, but your lecturer will be able to see your name.
Technical considerations
- Report issues using live streaming.
- iOS and Android devices are not supported for live streaming.
- A typical one-hour live stream consumes an average of one gigabyte (GB) of data. Be aware of your internet data allowances and caps. For the best experience, connect via a strong and stable wi-fi connection or wired connection. Your experience may vary if you use a mobile data connection.
Guide - Watching live streams
Your lecturer will prompt you to log in to iLearn and open Echo360 Active Learning Platform on your own device where you can answer quizzes and polls and view other presentation slides your lecturer has chosen to share.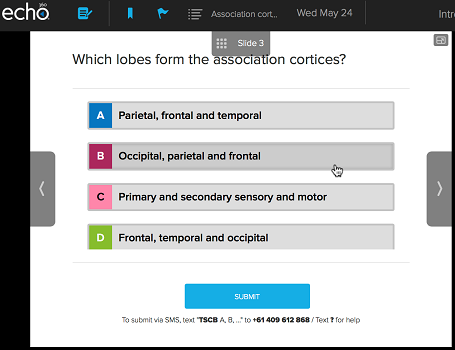
- Use the arrow buttons to navigate through the slides. You lecturer may choose to hide certain slides until a certain point in time during the lecture.
- Participate in quizzes and polls throughout the presentation by clicking on or typing in answers and submitting. Poll results and correct answers will appear within each interactive slide.
- Take personal study notes for later review and bookmark important slides.
- Flag any confusing slides. Your lecturer will see a total count of students that found a particular slide confusing.
- Select the Q&A icon to view or respond to discussions. Select the New Question icon to submit a question to the discussion. Q&A submissions are visible to other students and any instructors active in the Q&A section. You can post questions anonymously to fellow students, but your lecturer will be able to see your name. The Q&A feature may be disabled in some units.
Guide - Using interactive presentations
Helpful tools and features
The Echo360 Active Learning Platform has several tools and features that you can use as you watch recordings, live streams and participate in interactive presentations.
- Watch this short video for an overview of useful tools and features [Vimeo video]
- Guide - An overview of tools and features
- Guide - Private study notes
- Guide - Viewing and posting in the Q&A section.
- Guide - Flagging confusing content and bookmarking
- Guide - Personal study guide containing your notes and bookmarks
Accessing Echo360 transcripts
For recordings created after July 2021, Echo360 automatically creates a transcript using speech recognition technology.
Look for this icon while viewing an Echo360 recording to display the transcript.

Are transcripts the same as closed captions?
Automatic transcripts differ from closed captions in two ways. First, the automatic transcript is displayed in a separate window to the video itself whereas closed captions would overlay the video. Second, closed captions intended for accessibility are typically edited by a human and highly accurate, as opposed to automatic transcripts, which are machine generated.

How accurate are the automatic transcripts?
It can vary depending on the quality of the recorded sound. A recording of a presenter using a high quality and well-positioned microphone will result in more accurate transcripts compared to a recording with a presenter using built-in laptop microphone or speaking some distance away from the microphone. The automatic transcripts may also misinterpret some technical language and terminology. Talk to your lecturer if you have concerns about the quality of the audio or transcripts.
Why would I use automatic transcripts?
Some benefits which can improve your use of Echo360:
- Improved Learning - We have all heard the distinctions between visual, auditory, and kinesthetic learners, now with the video transcript window, students have yet another way to engage with their content. With the transcript pane open in Echo360, students can read along with the audio track to any video. There is a moving highlight that helps to keep their reading focus in sync with the video and audio content, and they can even copy phrases out of the transcript into their personal notes.
- Search and Navigation – Not only are transcripts searchable, but the search results are easy navigation links too. You can search for a key term in a video and click through the search results to go to each moment in the video where that term appears. This form of navigation should be invaluable to students as they study important concepts in a course.

Search within all recordings in a course
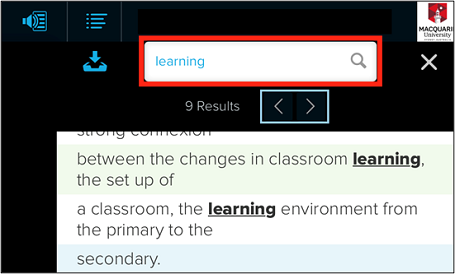
Search while watching a specific recording
Capturing Recordings
To install this software:
- Go to any of your iLearn units and click the Echo Active Learning Platform block.
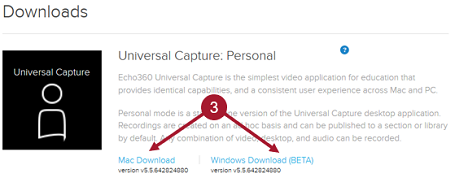
- Click the Settings menu and select Downloads.
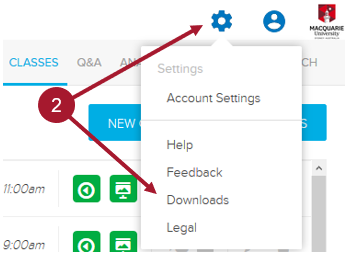
- Select the Mac or Windows version to download. Save the file to your computer.
- Locate the downloaded installer file in the Downloads folder.
- Click Open on the warning message.
- Follow the prompts to complete the installation.
- The Echo360 Universal Capture icon
 will appear on your desktop.
Login to Echo360
- Click the Echo360 Universal Capture icon and click on Click here to login.
- Enter your staff email address.
- Enter Macquarie University as the institution and click Submit.
- Enter your MQ OneID.
- Click Open link.
Capture a recording
You need to configure your screen to record what you would like to capture.
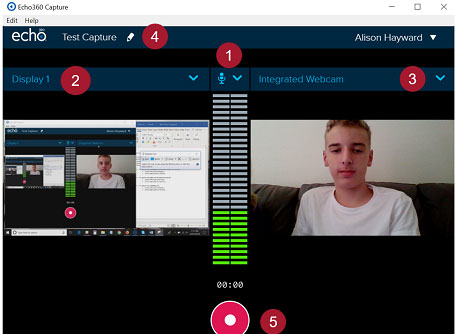
- Audio – Select the audio device you would like to use.
- Decide what you would like to capture from the Left Panel.
- Decide what you would like to capture from the Right Panel
- To capture your desktop and your face through the webcam:
- Set the left panel to 'Display 1'.
- Set the right panel to 'Webcam'.
- To capture your face only through the webcam:
- Set the left panel to 'No Input'.
- Set the right panel to 'Webcam'.
- To capture your desktop only:
- Set the left panel to 'Display 1'.
- Set the right panel to 'No Input'.
- To capture your desktop and your face through the webcam:
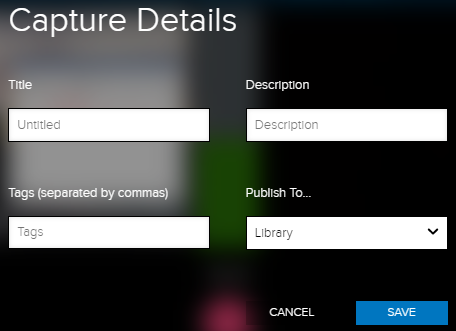
- Click the Pencil icon or title to launch the Capture Details dialogue box.
- Enter a Title, add a Description or Tags and leave the Publish To field as Library.
- Click the Record button. A count down should appear on your screen and the Universal Capture window will minimise and the capture will begin. A recording needs to be at least 15 seconds long (even after all the edits have been done) to save the recording.
- You can now pause the recording for any reason, then resume when you are ready.
- When you are done, click Finish.
- Click the X to cancel the recording.

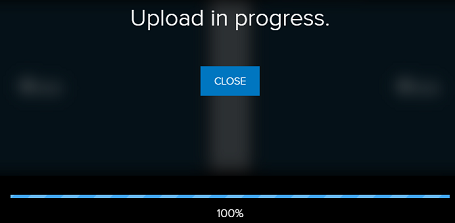
- Once you have stopped the recording, it will automatically upload to the Echo360 Active Learning Platform.
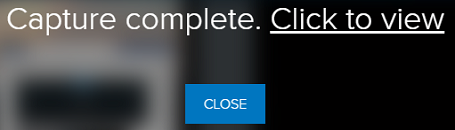
- Click the link to view the recording.
Note: All applications in macOS need individual user permission to record the Desktop. Check this Allow access to Inputs in macOS guide from Echo360.
Editing and Sharing Recordings
There are two ways to access and edit your Universal Capture recording.
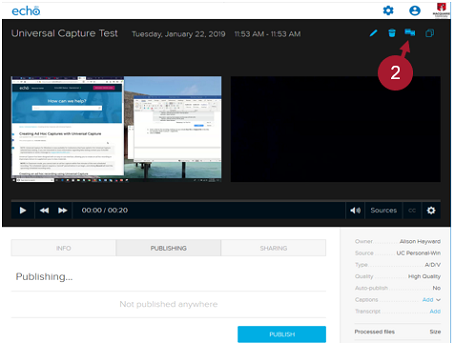
- Once you have stopped the recording, it will automatically upload to the Echo360 Active Learning Platform and it will appear in your web browser.
- Click the Edit video icon.
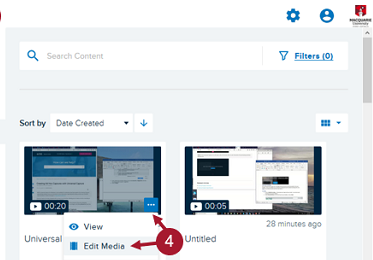
- Or, from your iLearn unit click the Echo Active Learning Platform block from your iLearn unit. Click Library in the top left corner.
- Locate your recording. Hover your mouse over the recording, click on the three dots and select Edit Media.
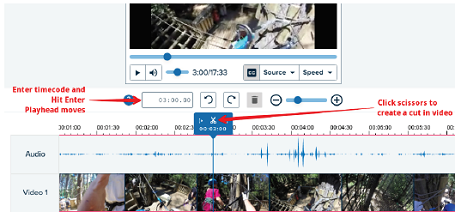
- The media editor consists of three main functional areas:
- Player – Play the recording at any time, with any edits applied
- Tool Kit – Access help, enter a specific timecode for precise play head placement, undo, redo, delete clip and zoom in/out of the timeline
- Timeline – Shows trim handles, scissors/cut video, plays head current location, the timeline of recording, audio and video channel/s
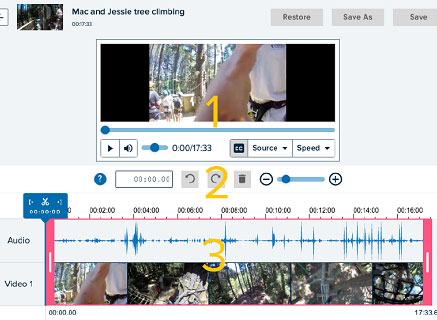
- Click on the play button to view the recording.
- Click the left trim handle (in pink) and drag to the desired starting point on the timeline.
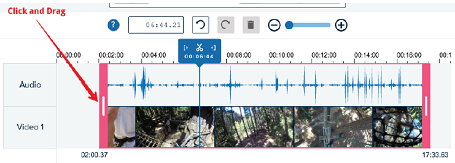
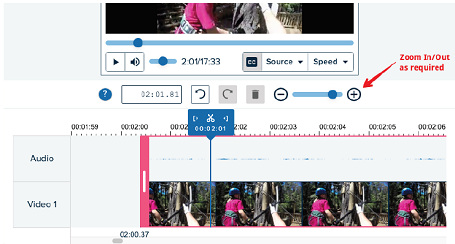
- For a more precise trim, use the zoom levels.
- When you locate the beginning location of the segment you want to cut or enter the timecode, click the Scissors button.
- Move the play head marker to the end location of the segment you want to cut and click the Scissors button.
- Click in the area between the cuts to select it (this will also move the play head into that area; ignore it). Click Delete to temporarily cut that segment from the video.
- The segment turns grey to indicate it is no longer part of the playback.

- Repeat steps 8 to 11 for each segment you want to remove from the video. Remember these cuts are temporary until you save your changes.
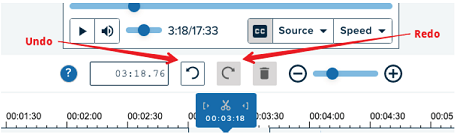
- To undo the last action, click on the Undo button.
- Keep using the Undo button until all actions have been undone as required.
- You can use Redo if you accidentally undo too many actions.
- To undo all cut segments, click on Restore.

- The last step is to apply the edits, where all the cuts will be removed. Click Save As and save the file as a new name or add Edited to the title. If you don’t change the name, the original and edited file will have the same name and you won’t know which one to share.
To share or submit your recording as an assignment, see the information under Student video submissions.
Student video submissions
Your convenor may decide to use the Echo360 Active Learning Platform to receive video uploads from students, perhaps for an assignment. They will give you information on which video sharing method you should use and where you should paste the URLs for viewing or grading.
The Echo360's Universal capture software is available to students to create screen and webcam recordings for assignment submissions. Follow the instructions under 'Echo360 ALP Universal Capture software installation' below if you would like to use the software to record.
Submitting a video file
- Login to your iLearn unit and select an assignment.

- Click Add submission.
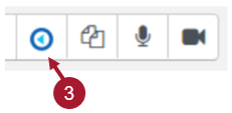
- In the editor toolbar, click the Echo360 icon.
- Click Upload Existing Media and click Select Media. Use the options to browse for and select the video file or connect to a storage service if your video file is hosted there.
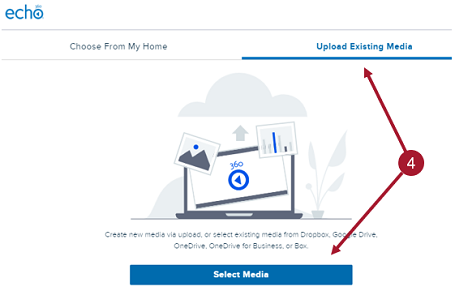
- Find the video on the list and click Insert. Previously uploaded videos will appear on this list, so take care to identify and insert the correct video.
- Click Save changes. Do not edit the text contained in the editor.
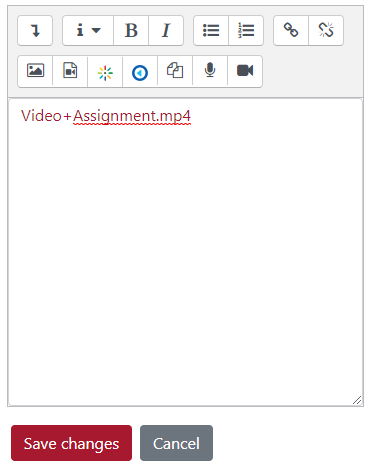
The video has now been submitted for grading. You can close the tab or return back to iLearn. You may notice the video is not immediately viewable while it is being processed by Echo360, but it will be visible to your convenor in short. If you do wish to see the video after it is processed, you can return back to the assignment page later or refresh the webpage until the video displays. As a guideline, a five-minute video may take five minutes to process and display, a 30-minute video may take about 30 minutes before it can be played.
- Log in to iLearn and access your unit.
- Click the Echo360 Active Learning Platform block link.
- Within the Active Learning Platform, click on Library then Create in the top left.
- Click Upload Media.

- Select a video file from your computer to upload.
- Wait for upload and processing to complete.
- Click the thumbnail for the video just uploaded. You can complete the following steps even whilst the video is being processed
- Hover your mouse over your uploaded video, click on the three dots and select Share.

- Click the Links tab and click Add Link.
- Ensure Public Access is enabled.
- Click the Link URL to copy it. You can paste the URL in a forum (for other students to view), in an assignment submission (for formal grading) or in an email.

- Create or reply to a forum post in iLearn.
- In the message editor, click the blue Echo360 icon.

- To embed video which already exists within your Echo360 library, choose From my Home to list your videos. Select a video in the list and click Insert.
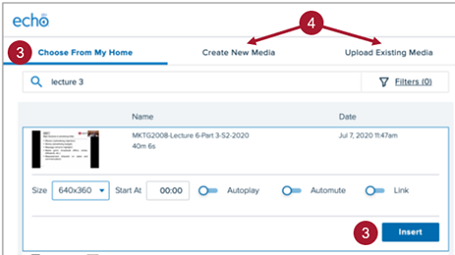
- Alternatively, you can upload a video file by choosing Upload Existing Media or launch Universal Capture to start a new recording by choosing Create New Media. Once the recording or file upload is complete, you can then select it for embedding.
 After selecting and inserting any video, a red text which includes the video’s title will show in the forum message editor. Do not modify this text or its underlying URL. You can, however, type a message on the prior or preceding line and this will appear along with the video embed in your forum post.
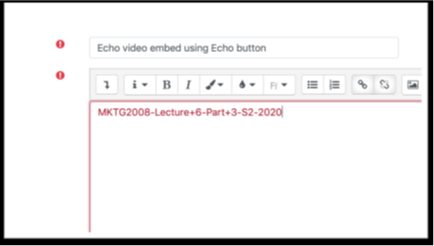
- Click Save at the bottom of the page to complete the forum post.
- You can use the Echo360 app to stream or download completed recordings for offline viewing within the app, then watch them later.
- You can also use this app to participate in polls and quizzes if your lecturer is conducting them through Echo360.
- At this time, the Echo360 app cannot be used to view live streams (only playback completed recordings).
- To display your study unit within Echo360, you must first access iLearn and click the Echo360 link in each iLearn unit you want to be displayed in the app.
- Download the app for iOS, Android and Windows 10 devices.
Further help
If you have any issues using the Echo360 Active Learning Platform, contact OneHelp.
Ground Floor, 18 Wally's Walk
Macquarie University